Airtable 사용법
Table of contents
프론트 개발자가 혼자 가벼운 프로젝트를 진행하거나 초기 프로토타입을 만들 때 DB를 구축해서 REST API가 필요한 경우가 종종 생길 수 있다. 그때 직접 서버와 데이터베이스를 구축하는 것이 부담스럽고 굳이 그렇게까지 필요가 없는 상황이라면 Airtable을 통해 간단하게 데이터를 저장하고, 불러오고 등의 CRUD 작업을 할 수 있다.
✅ Airtable에 대한 정보가 많이 없는 상황이라서 Airtable 세팅 및 React + TypeScript 조합에서 CRUD하는 법을 간단하게 정리합니다. (따라서 코드를 엄청 깔끔하게 작성하기 보다는 가독성이 좋은 방향으로 작성했습니다.)
Airtable
- 구글 스프레드시트 보다 강력하고, 데이터베이스 보다 쉬운 구글 스프레드시트 + 데이터베이스와 같은 형식의 온라인 서비스로 Airtable의 개념 자체는 생활코딩에서도 강의로 확인할 수 있다.
- 즉, Airtable에 데이터를 저장해놓고 Airtable에서 제공하는 REST API를 통해 CRUD 작업을 할 수 있고, 또는 Airtable에서 직접 데이터를 수정할 수도 있다.
- 초기 프로토타입을 만들 때 많이 사용한다
- 초당 5번까지 API를 요청할 수 있어서 실제 서비스용은 아니지만 관리자용으로는 좋다
Airtable Setting
- Airtable 회원가입/로그인
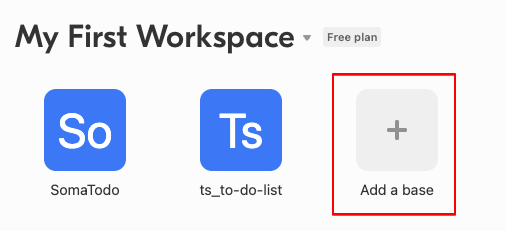
- Workspace 만들기
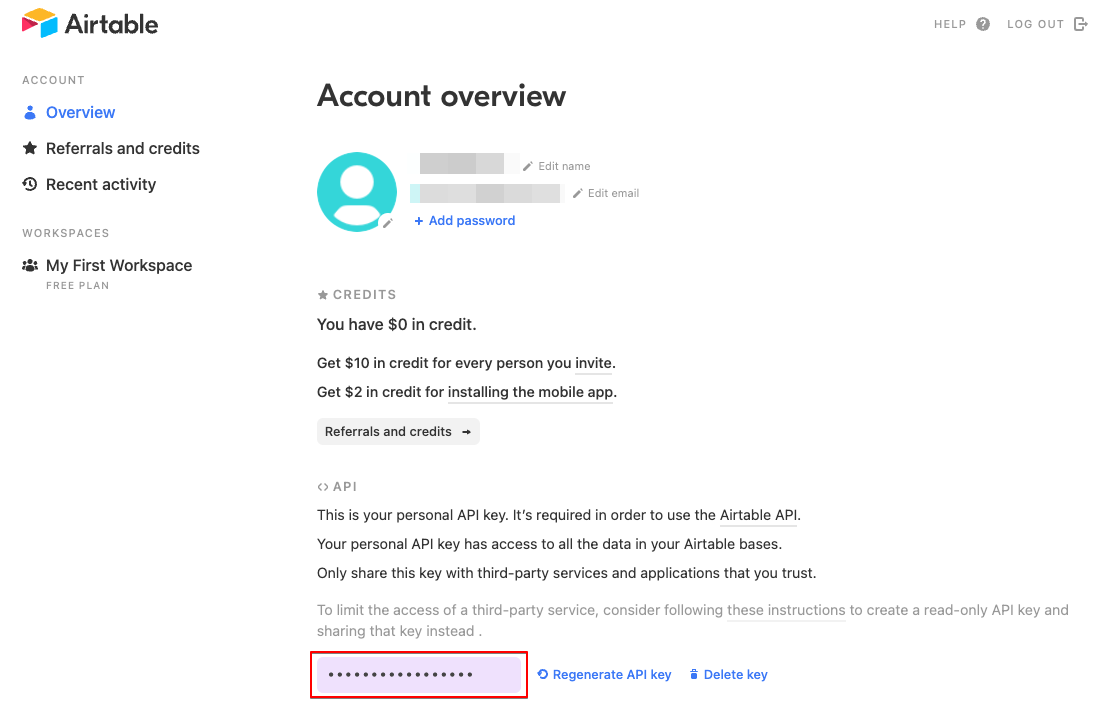
- 계정정보에서 API Key 확인하기 ⇒ 나중에 사용 예정
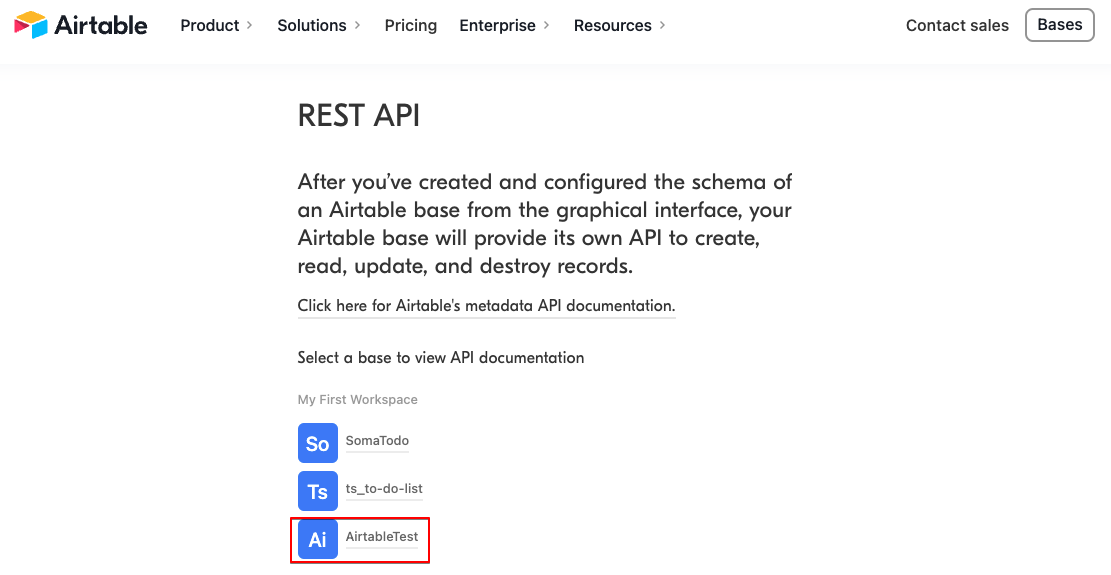
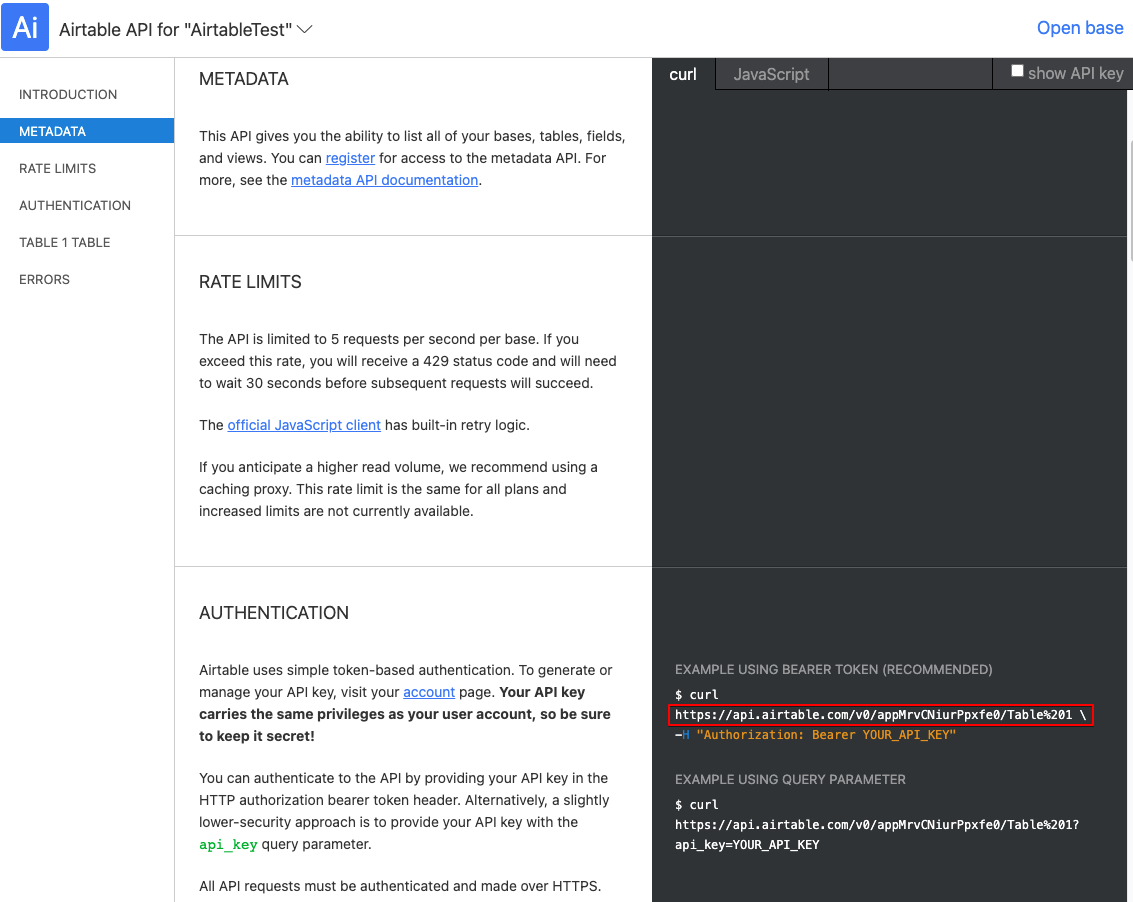
Airtable REST API에서 base url을 확인할 수 있다
CRUD
- CRUD 예제를 위해 간단한 TO DO LIST를 만들 예정이다
Airtable에 TO DO를 저장하기 위해서
Name과Done이라는 field를 만든다.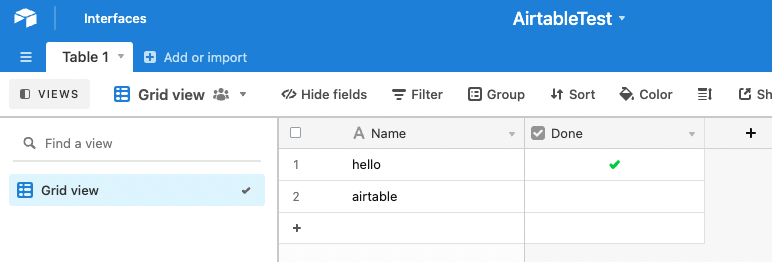
- Airtable에 저장된 TO DO들을 불러와서 읽고, Done의 내용을 업데이트하고, 삭제하고, 추가하는 기본적인 CRUD 작업을 할 수 있다. 물론 저기서 직접 추가, 삭제, 수정의 작업을 해도 반영되지만, 아마도 우리가 원하는 것은 리액트에서 그 작업을 하는 것이니 밑에서 확인해보자!
Airtable에 저장되는 데이터
TO DO를 만들기 위해서 먼저 Interface부터 입력하자면 다음과 같다. (TS 를 이용하지 않는다면 필요없다.)
- id와 createdTime은 Airtable에서 자동으로 생성하는 정보
- 우리가 Airtable에서 볼 수 있는 정보는 fields안에 object로 입력된다.
interface TodoInterface {
  id: string;
  fields: { Done: boolean | undefined; Name: string };
  createdTime: string;
}
REST API 사용을 위한 baseURL과 header 설정
const baseURL = "여기에 본인의 Airtable baseUrl을 입력해주세요";
const options = {
  headers: {
    Authorization: `Bearer ${process.env.REACT_APP_AIRTABLE_KEY}`,
    "Content-Type": "application/json",
  },
};
- 위에서 확인한 baseURL과 API Key가 필요한 타이밍이다.
- 위에 baseURL에 적혀있는 URL은 내 Airtable의 URL이므로 본인의 baseURL을 입력해야 한다
- API Key는 개인정보이므로 가능한 Git에 올리지 않도록 환경변수로 설정하기
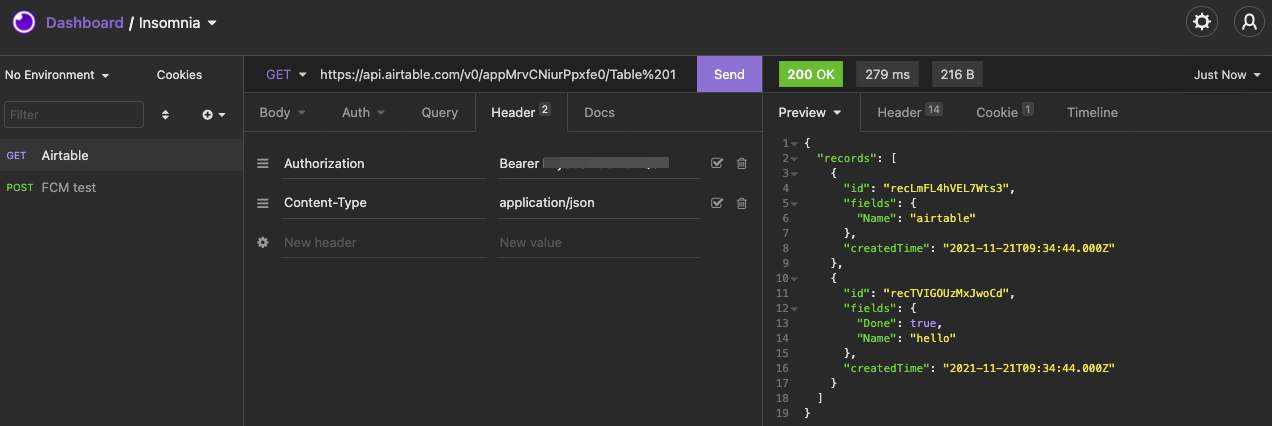
- API를 요청할 때 header에
Authorization: Bearer YOUR_API_KEY와Content-Type: application/json를 넣어줘야 한다.Insomnia를 통해 API 요청을 보내도 확인할 수 있는데, 아래와 같다
Create
TO DO를 생성해서 Airtable에 저장하기
const handleAddTodo = async () => {
  const name = inputRef.current?.value; // 할일 이름인 name 값을 input에서 입력받기
  const newTodo = {
    fields: {
      Name: name,
      Done: false,
    },
  };
  name &&
    (await axios.post(
      baseURL,
      {
        records: [newTodo],
      },
      options
    ));
  handleRefresh(); // TODO를 저장한 뒤 다시 읽어오기 위해서
  if (inputRef.current) inputRef.current.value = ""; // 저장한 후에는 입력창을 빈칸으로
};
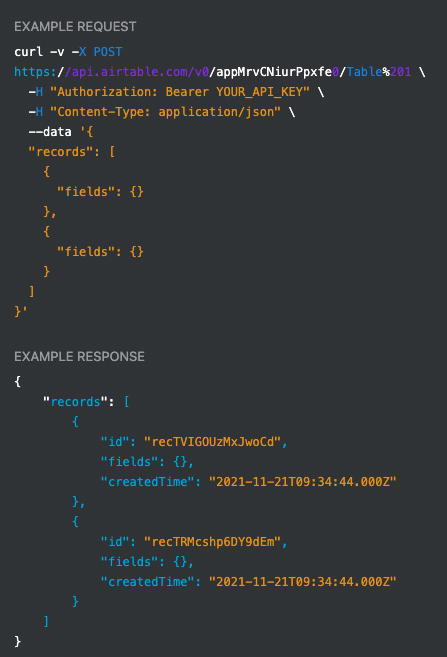
- 투두리스트를 예시로 들다보니 실제로 필요한 코드보다 조금 길어지긴 했는데, 기본적인 개념은 다음과 같다. ⇒
post를 이용해서 추가하고자 하는 정보를 records에 배열로 담아서 보내면 된다. TO DO의 기본 정보인 id와 createdTime은 Airtable에 저장되면서 자동으로 생성된다. - 위 정보를 Airtable의 공식문서에서 찾아보면 다음과 같다.
Read
Airtable에 저장된 TO DO 불러오기
const handleRefresh = async () => {
  const response = await axios.get(baseURL, options);
  const records: TodoInterface[] = response.data.records;
  setTodos(records); // 읽어온 데이터를 todos에 저장
  setLoading(false); // 데이터를 다 불러왔다면 로딩 종료
};
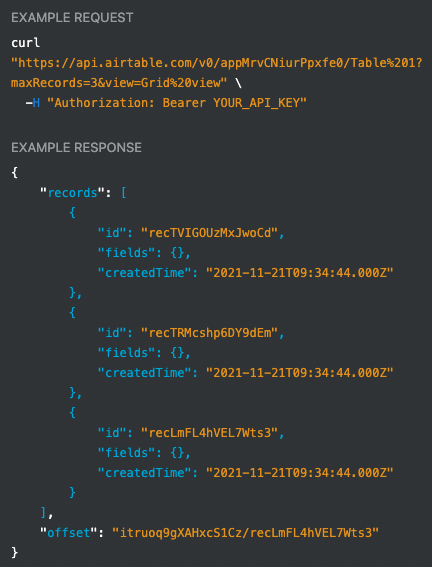
- 데이터를 읽어오는 것은
get을 이용하면 된다. 데이터는 axios로 불러온 값의 data 안에 records 안에 배열로 확인할 수 있다. - 위 정보를 Airtable의 공식문서에서 찾아보면 다음과 같다.
Update
Airtable에 저장된 TO DO의 완료 상태값(Done) 변경
const handleUpdateTodo = async (todo: TodoInterface) => {
  const updatedTodo = produce(todo, (nextTodo) => {
    nextTodo.fields.Done = !todo.fields.Done;
  });

  await axios.patch(
    `${baseURL}/${todo.id}`,
    {
      fields: updatedTodo.fields,
    },
    options
  );

  handleRefresh(); // TODO를 업데이트한 뒤 다시 읽어오기 위해서
};
- Create처럼 예제 때문에 코드가 조금 길어졌지만, Update의 핵심도
patch를 이용해서 fields 데이터만 전달해주면 된다. 데이터의 id는 baseURL 뒤에 넣어준다. - 참고로 TODO의 상태를 업데이트하기 위해서 immer(불변성을 유지하면서 업데이트하기 위한 라이브러리)를 이용했다. (위 코드에서는 immer를 produce 라는 이름으로 불러와서 사용하고 있다.)
Delete
Airtable에 저장된 TO DO 삭제
const handleDeleteTodo = async (todo: TodoInterface) => {
  await axios.delete(`${baseURL}/${todo.id}`, options);

  const newTodos = todos.filter((item) => todo.id !== item.id);
  setTodos(newTodos);
};
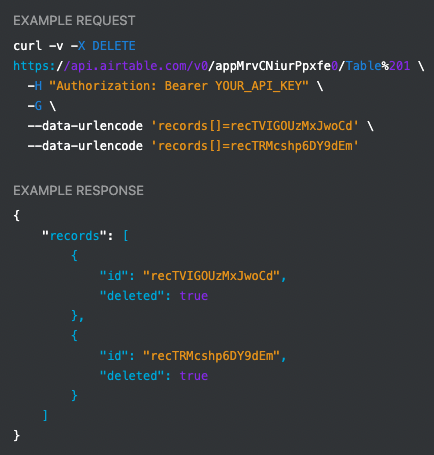
- Delete는 Read처럼 간단하다.
delete를 이용해서 삭제하고자 하는 데이터의 id를 baseURL 뒤에 전달해주면 된다. - 위 정보를 Airtable의 공식문서에서 찾아보면 다음과 같다.
TO DO LIST (React + TypeScript + Airtable)
아래 코드를 실행하기 위한 세팅
npm i --save typescript @types/node @types/react @types/react-dom @types/jest
npm i styled-components
npm i --save-dev @types/styled-components
npm i @fortawesome/fontawesome-free
npm i axios
npm i --save immer
App.tsx
import { useEffect, useState, useCallback, useRef, KeyboardEvent } from "react";
import styled from "styled-components";
import axios from "axios";
import produce from "immer";
interface TodoInterface {
id: string;
fields: { Done: boolean | undefined; Name: string };
createdTime: string;
}
function App() {
const baseURL = "여기에 본인의 Airtable baseUrl을 입력해주세요";
const options = {
headers: {
Authorization: `Bearer ${process.env.REACT_APP_AIRTABLE_KEY}`,
"Content-Type": "application/json",
},
};
const [todos, setTodos] = useState<TodoInterface[]>([]);
const [loading, setLoading] = useState<boolean>(true);
const inputRef = useRef<HTMLInputElement>(null);
const handleRefresh = useCallback(async () => {
const response = await axios.get(baseURL, options);
const records: TodoInterface[] = response.data.records;
setTodos(records);
setLoading(false);
}, []);
useEffect(() => {
handleRefresh();
}, [handleRefresh]);
const handleUpdateTodo = async (todo: TodoInterface) => {
const updatedTodo = produce(todo, (nextTodo) => {
nextTodo.fields.Done = !todo.fields.Done;
});
await axios.patch(
`${baseURL}/${todo.id}`,
{
fields: updatedTodo.fields,
},
options
);
handleRefresh();
};
const handleDeleteTodo = async (todo: TodoInterface) => {
await axios.delete(`${baseURL}/${todo.id}`, options);
const newTodos = todos.filter((item) => todo.id !== item.id);
setTodos(newTodos);
};
const handleAddTodo = async () => {
const name = inputRef.current?.value;
const newTodo = {
fields: {
Name: name,
Done: false,
},
};
name &&
(await axios.post(
baseURL,
{
records: [newTodo],
},
options
));
if (inputRef.current) inputRef.current.value = "";
handleRefresh();
};
const onKeyDown = (e: KeyboardEvent<HTMLInputElement>): void => {
if (e.key === "Enter") handleAddTodo();
};
return (
<>
{loading ? (
<Loader>Loading...</Loader>
) : (
<Container>
{todos.map((todo) => (
<TodoBox key={todo.id}>
<h1>{todo.fields.Name}</h1>
{todo.fields.Done ? (
<BtnCheckDone
onClick={() => {
handleUpdateTodo(todo);
}}
/>
) : (
<BtnCheck
onClick={() => {
handleUpdateTodo(todo);
}}
/>
)}
<BtnDelete
onClick={() => {
handleDeleteTodo(todo);
}}
>
<i className="fas fa-trash"></i>
</BtnDelete>
</TodoBox>
))}
<AddForm>
<AddBtn onClick={handleAddTodo}>
<i className="fas fa-plus"></i>
</AddBtn>
<input
ref={inputRef}
type="text"
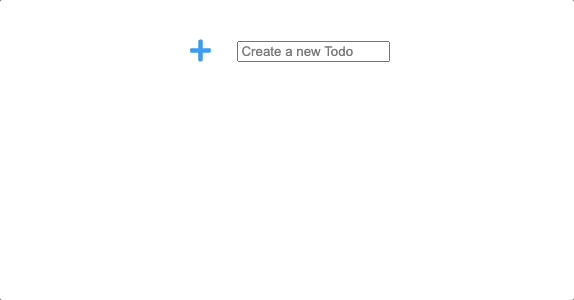
placeholder="Create a new Todo"
onKeyDown={onKeyDown}
/>
</AddForm>
</Container>
)}
</>
);
}
const Loader = styled.span`
text-align: center;
display: block;
`;
const Container = styled.div`
display: flex;
flex-direction: column;
justify-content: center;
align-items: center;
`;
const TodoBox = styled.div`
display: flex;
justify-content: center;
align-items: center;
`;
const BtnCheck = styled.div`
margin-left: 30px;
width: 30px;
height: 30px;
border: 3px solid #2096f3;
border-radius: 50%;
`;
const BtnCheckDone = styled(BtnCheck)`
width: 36px;
height: 36px;
border: none;
background-image: url("/check.png");
background-repeat: no-repeat;
background-size: cover;
background-position: center center;
`;
const BtnCss = styled.button`
background-color: transparent;
border: 0;
`;
const BtnDelete = styled(BtnCss)`
font-size: 22px;
background-color: transparent;
border: 0;
margin-left: 10px;
`;
const AddForm = styled.div`
height: 100px;
background-color: white;
display: flex;
align-items: center;
`;
const AddBtn = styled(BtnCss)`
color: #2096f3;
margin-right: 20px;
font-size: 25px;
`;
export default App;